FAQ

About Voucher Codes

What’s a Voucher Code?

Voucher Codes are pre-paid codes that you purchase through our online store and redeem when uploading completed projects you've designed using our software.

Voucher Codes purchased through our online store are heavily discounted (60% off RRP for Members) and represent excellent value for money. If you prefer to pay-as-you-go, you can simply pay the full RRP when you upload your projects to us.

How do I purchase Voucher Codes?

The easiest way is through our online store.

You can also arrange purchase over the phone by calling 1300 655 956 or emailing us at forms@photobooksrus.com.au.

How long do Voucher Codes last? Do they expire?

Each Voucher Code has a standard expiry period of 3 months from the date of purchase. If you purchase multiple voucher codes in a single transaction, then 6 months expiry applies to all voucher codes purchased in that transaction.

Extensions of up to 3 months can be purchased from this page.

I’ve purchased Voucher Codes. Where do I get them?

Your voucher codes will be sent to you via email, usually within 24 hours of completion of purchase. Add 'forms@photobooksrus.com.au' to your email's address book to ensure you receive your voucher codes and other correspondence.

I have a voucher code I purchased from a ‘deals’ company to use with your software

That's cool. Voucher codes issued by third-party 'deals' companies (Groupon, etc.) usually work without problem, but if you run into any difficulty, please forward us the voucher code you've been given to forms@photobooksrus.com.au and we'll check it out to ensure it's valid and ready to use.

Software

How do I download the PhotobooksRus software?

You'll find the download form on the right side of this page (or at the bottom of the page on mobile devices).

Simply enter your email address, select your operating system (Windows PC or Mac) and download.

The software installer is approx 120mb to download.

If you'd prefer us to send you the software on disc, please email us at forms@photobooksrus.com.au

How do I update to the latest version of the software?

Step 1. Click on Create New Project.

Step 2. In the bottom left corner of the next screen, click on the 'check for updates' button. (Please note that this is a list of items that need to be updated for the software to perform correctly, this is not where you select a project to build.)

Step 3. A list will appear. If the option is available, tick - APPLICATION DATA X.X.X - first and install.

Then tick all of the options and complete installation of updates. Do not stop installing as you may not get all of the software and have uploading issues.

I can’t get updates / I can’t upload my project. The server connection fails.

Some networks (workplaces especially) are set up to block certain applications (including ours) from connecting / uploading to the internet. Sometimes this is set by accident, or by necessity.

Sometimes computers are set up with very tight security restrictions that stop some applications (including ours) from running with all the 'permissions' required to connect to the server. If you're on a PC, we suggest finding the PhotobooksRus program, right-clicking it and selecting 'Run as Administrator' from the contextual menu. This may help. If not, try adding the PhotobooksRus software to your Firewall exclusion list, to allow it through your firewall. Sometimes anti-virus programs use their own firewalls, so it may be worth checking or temporarily disabling those too.

While we're happy to offer advice and do a little trouble-shooting of common issues, your particular computers/networks are your own responsibility. The software has a 'Mail CD/DVD' option specifically designed for people having issues with uploading the regular way. There's a PDF Guide available, explaining an alternative way to 'manually' upload your completed project to us.

If you need a full copy of the latest version of the software (including all project updates, application data updates and assets) please email forms@photobooksrus.com.au to request a link. Please be aware that this full edition of the software is VERY large to download, and will still check for updates once installed.

Hey, the software keeps asking me to download updates. What do I do?

The short answer is download them - even the ones you don't think you'll need.

It's very important to download updates as they become available. Some updates are just extra assets (masks, frames, backgrounds etc.) but others are more important.

Project or application updates should be downloaded and installed before starting a new project. Updating projects or the application won't effect any projects you've already started.

Application data updates should be downloaded as soon as they become available, and must be updated on their own (the only item selected.) Without regular updates, your project may become unusable, or print incorrectly when uploaded to us.

We suggest downloading updates using a dedicated ADSL/ADSL2/NBN broadband connection (not 3G, 4G or any other mobile-device-based network) as some updates can be relatively large and will use a significant proportion of your data on smaller plans.

Wi-fi in your own home or at work is fine. Some workplaces may block the application from accessing our server. If you have issues connecting to our server, please try again on another network or computer.

The software is running slow or stalling. What’s up with that?

It’s possible that your computer doesn’t meet the minimum technical specifications for the software:

PC: Windows 7 or higher recommended, 4GB Ram (8+ recommended)

Mac: OS X 10.8 (Mountain Lion), 4GB Ram (8+ recommended)

Please note: The PhotobooksRus software is not available for Linux, Android or iOS.

To check if your Windows PC meets the minimum specifications, right-click on the ‘Computer’ or ‘My Computer’ icon on the desktop, and from the contextual menu, select ‘Properties’.

Creating a Project

Step 1. After updates have been completed click on Create New Project, and select the product that matches the Voucher Code your purchased.

Step 2. Design your product.

Remember to save regularly. Make it like breathing. Every time you finish a page, save. If you need to get up from the computer, save your project first. Trust us, this is for your own good. Our software does not auto-save.

Be aware that the software will place a red 'alert' symbol on images that are too low-resolution to print well.

I have my photobook designed as a PDF. How can I import individual pages into PhotobooksRus?

You'll need to convert your PDF to JPEG in order to import them. PDF2JPG is a free online tool you can use to convert PDF files to Jpeg. Be sure to select 'Excellent - 300dpi" before converting. At 300dpi your converted jpeg files should be nice and sharp, provided the PDF is high quality to begin with.

I can’t get my pictures from iPhoto to the PhotobooksRus software (Mac Only)

iPhoto and the PhotobooksRus software are not directly compatible. We suggest you create a new folder on your computer, and copy all of the images you wish to use into this folder (making sure you do not link it back to iPhoto) then import these images into the PhotobooksRus software.

Can I use an external or portable hard-drive, USB device or network storage with the PhotobooksRus software?

The short answer is no. Please ensure that all photos required for your project are stored in a folder on the computer where the PhotobooksRus software is installed.

I can’t find the photobook or photo gift I purchased in the software

Please ensure all product updates are ticked and installed. See above "How do I update to the latest version of the software" for instructions on running updates.

What’s the best way to organize my photos before I start my project?

We suggest going through all of the photos you may want to include in your project and putting them all in a single folder on your desktop. Name the folder something memorable like "Holiday Photobook Photos - DON'T DELETE ME" or something similar.

If you want to go one step further, you could also rename the photos, making sure to keep the file extension (.jpg etc.) with helpful page numbers and a description - "Page01-Johnny-at-the-beach.jpg" for example. That way, when you're done and ready to put your images in your project, they're already in some kind of order that makes sense to you.

We don't recommend burying image files in folders inside folders, inside folders... as when using the 'Import folder...' function, the software will only look inside the first folder you show it, and not inside any of the folders inside that first folder.

You can, of course, always select individual image files or groups of image files to import manually.

I just opened my project and the software says my photos are missing.

Our software doesn't move, copy, or store your photos. It only remembers where they were when you imported them into your project. When the software alerts you that images are missing, it means the folder/s containing the original image files (or the files themselves) have been moved, renamed or deleted by a user (or sometimes another program) since you opened the project last.

This is a common problem for Mac users who manage their photos through iPhoto. iPhoto often moves and renames folders to keep your photos organised. It does, however, cause the 'missing images' error in our application, and causes problems for other applications too. We recommend not using iPhoto while preparing and designing your projects.

If you imported your images from an external drive or CD/DVD (which we don't recommend), try plugging the external drive back into the exact same USB slot or putting the CD/DVD back into the CD/DVD drive, and then re-open the project. If the image files are still on the external drive, in the same folder/s they were when you imported them into your project and haven't been renamed, the software will be able to load them.

If the image files are on your computer's hard drive, but the folder containing the original image files, or the files themselves, have been moved or renamed, you may need to show the software where they are now located. There's a tutorial on this subject on the tutorials page.

If the image files have been deleted, and you have a backup, we suggest placing the backed-up image files back in their original location and re-opening the project.

I think I may have low resolution / low quality images. How can I tell?

Often when photos are put up on websites (facebook, etc.) or emailed, they are reduced in quality, creating 'lossy' jpeg 'artefacts' (messy looking pixels). When printed, these photos can look very poor. Look closely at the comparison image below. You'll see 'blocky' sections, and lots of small blurred parts too.

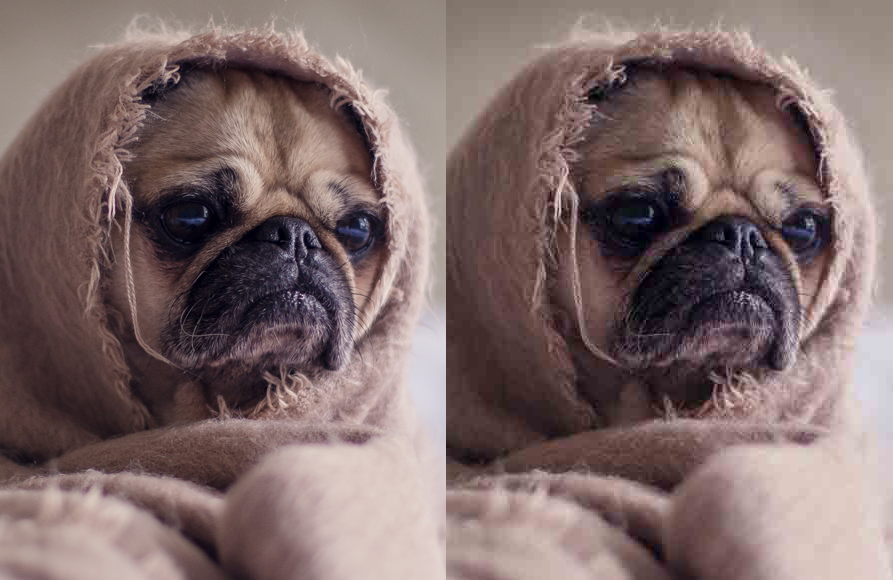
While the image on the left looks very sharp, the 'lossy' or 'low-quality' version on the right looks blurry and pixelated. The image on the left would look pretty good printed, provided the resolution is high enough, but the image on the right definitely wouldn't.

There’s a little red or yellow warning symbol on some of the photos in my project

That symbol is just there to let you know that the image may not print very well because the resolution is lower than expected.

Sometimes that low-resolution photo is the best photo you have of that particular person, place or event. That's OK. The software will still allow you to order your project, but it's only fair to let you know that the printed result might be less than optimal.

About Projects and Images

The Images in my Photobook look dark

It needs to be stated that PhotobooksRus cannot be held responsible for images that have been taken on a camera that has not been set up by us, and used in conditions we have no control over.

The next major consideration is screen calibration. If the screen on your computer has never been calibrated, calibrated recently (in the last 2 days before creating the book) or if the contrast and brightness controls have been boosted (as is the case with all laptops), it is worth noting that when printed, colours may appear very differently than what you see on your screen.

When a photobook is produced it is printed with 3 other books on the same sheet of paper using the same colour profile and print procedure. Our production machines are calibrated daily to an ISO/Xerox approved standard and procedure.

Basically what this means is that either all 3 photobooks would have an issue on every page with every image and are wrong, or the book has been printed correctly according to the files that have been supplied.

So what's the difference between what is displayed on my computer and what will be printed?

Imagine making an image out of 3 different coloured fairy lights in a dark room, as opposed to making the same image with just 3 coloured markers, plus a black one. That's how different these two colour systems are.

When you take a photograph on your DSLR, your camera will compose your shot using colour values on the RGB spectrum. RGB stands for Red, Green, and Blue and refers to the three primary colours that can always be mixed together in different variants to produce different colours and shades on digital monitors.

Computer monitors always display RGB, which is why DSLRs follow this format to make things easier for users. RGB is known as an additive colour system, as it relies on adding different amounts of each of the three colours to make different colours. The RGB range has 256 colours. By setting each RGB colour to a setting of "0" (so that particular pixel is effectively OFF) we can generate a kind of "black" (actually a very dark grey), while a setting of "255" generates white.

Therefore, RGB is the industry default for Digital Cameras and computer monitors, as it allows us to view colours true to life on screen. The software converts all image files to sRGB by default.

However, print operates on a different colour system, called CMYK. This stands for Cyan, Magenta, Yellow, and blacK. CMYK is a subtractive colour system, as cyan, magenta, and yellow pigments are used as filters, while black is added in various patterns and amounts to provide shading. This means that they subtract various amounts of colours from white light to produce different colours. Therefore, an image displayed on a computer monitor will not completely match a CMYK print. As RGB doesn't have a dedicated black channel, shadows or blacks can often appear too rich when printed.

If you take your work to a dedicated printer, they will ask for the image in CMYK, as it's the format in which they will have always worked. CMYK dates back to the days of colour printing and processing.

The output device we produce all books on is a digital device that prints in CMYK, as opposed to digital cameras which take pictures in RGB and Computer Monitors which are RGB also. Both our RIP and Igen4 printer system, which prints the books are calibrated several times a day using ISO International Standards Organization approved methods that allows us to achieve a balance that works with all of the files we receive. What this means is all pages are printed with the same settings and parameters so any changes to the ISO setting will affect all pages within a book.

For best colour-matching to your original photo files, we suggest working in sRGB colour space. The software will strip out and replace any other colour profile information. Some digital cameras allow you to select the colour space. If possible, shoot in sRGB to save yourself time.

Uploading and Completing Your Order

Completing a Project (Uploading to PhotobooksRus)

Step 1. Be sure to preview your completed photobook before uploading for printing. Make sure you are connected to the internet to upload. We recommend using a dedicated landline broadband internet connection where possible. Your 'shopping' membership account (as used on this website) may not be the same as your 'uploading' account.

If you haven't uploaded a project to us before, it very unlikely that you have an 'uploading' account at all. In this case, when prompted, clicking on the blue 'Create An Account' button on the first webpage that opens when you begin the upload process, will allow you to create a new account. You can use the same credentials (Email Address, Username, Password) as your existing 'shopping' account if you like.

Step 2. On the last page of the shopping cart, you will be asked to redeem your voucher code. When the voucher code has been entered, the total price will change.

Gift vouchers will reduce the total price by whatever value the gift voucher is valid for. Gift vouchers must be redeemed in one transaction. If the value of the item purchased is less than the value of the gift voucher, the balance is forfeited.

A voucher for a specific product should reduce the price to the advertised price for that particular item. If the pricing doesn't change as you expected, or if you're in any doubt at all, please contact us before completing your order.

I’ve entered my Voucher Code and pressed the redeem button, but there’s an amount left to pay

This could be for a few reasons. Have you selected the project that matches your Voucher Code? Have you added extra pages to your project? Have you selected 'Express Postage' or any other extra option? Extra options will incur additional charges. Any of these changes could mean your Voucher Code won't cover the total cost of your project as you've selected and/or designed it.

If you believe the Voucher Code is in error for some other reason, please email forms@photobooksrus.com.au with as much detail as you can (including the Voucher Code in question) and we'll be happy to help.

I can’t log in and the PhotobooksRus login page has adverts all over it

You may have spyware and or malware (malicious software that could be harmful to your computer) present on your computer. They're often installed along with other software, like toolbars for your browser.

We recommend installing and running a malware tool, such as Microsoft's Malicious Software Removal Tool or similar. For the record, our website never displays any adverts apart from one rather discreet one on the left-hand-side of the upload page. If you see any other ads, you may want to check for malware.

I can’t log in when I place my order for upload

To reset your 'upload' account, please click on the 'forgot password' link on the accounts page.

To reset your password on the 'upload' account, please email forms@photobooksrus.com.au with your username, or simply create a new account by clicking on the 'Create an Account' button when the software opens a browser to commence your project upload.

My Voucher Code won’t work. When I try to redeem it, the site says ‘Code Invalid’

Please ensure that your Voucher Code hasn’t expired yet. If it has, you can arrange an extension – just email forms@photobooksrus.com.au with the Voucher Code/s that have expired.

Not expired, but still not working? Please check you’re entering the Voucher Code correctly (no extra spaces etc.)

Still no go? Are you trying to redeem more than one Voucher Code at a time? Our system doesn’t currently allow multiple voucher codes to be used together. We suggest uploading each project separately, redeeming only one Voucher Code per upload. You can learn how to remove projects from your shopping cart on the tutorial page.

If you need multiple identical copies of the exact same project, upload the project once (redeeming one Voucher Code only) and email bulk@photobooksrus.com.au with your completed project order number (beginning with an OL818…) along with any remaining Voucher Codes to be redeemed and we’ll do the duplication at our end instead.

Still not working? Please email forms@photobooksrus.com.au with as much detail as you can, and we’ll be happy to help.

Delivery and Re-Ordering

How are my orders sent to me?

Hard Cover Photobooks and Canvases are sent using a tracked (registered e-Parcel) mail service, which may require signature on delivery (although not very often in our experience.)

Soft Cover, Spiral-Bound and Saddle-Stitched Photobooks, plus smaller items like calendars, iPhone Covers and Photo Cubes are normally sent via regular mail, unless you choose the e-Parcel option and pay the extra charge.

All items are packaged securely to ensure they reach you in good condition.

Can my order be express-delivered to me?

Yes, of course. It's an added charge that you can pay when uploading your project to us.

If you need express delivery on a bulk order, please let us know when asking for a quote. Express delivery may not be available for international orders.

I’ve moved. How do I change my Address details?

We are able to change your shipping address, providing you email the new address through to forms@photobooksrus.com.au within 2 days of placing your order.

In the event that a delivery is sent to your previous address, or an incorrect address. Re-sending or resupplying charges may apply.

How long does it take to get my order?

The usual production time for most orders is 7 to 10 working days (Monday to Friday, excluding public holidays) from the date your upload completes.

This estimate does not include the time taken to deliver your order, which will vary depending on how your order is being sent, and to where. Our production facility is located in Thomastown, Victoria, Australia.

We strongly suggest allowing at least 14 days if you need your order delivered before a particular date. We generally expect delivery delays during busy delivery times such as Christmas, and recommend ordering/uploading as early as possible.

Will my orders be sent individually or together?

Ninety-nine percent of the time your orders will be sent out individually. We handle each order on its own, packaging and dispatching items as they are completed. Some print-queues are short, others are longer.

Bulk orders, however, are always dispatched together, however depending on the quantity ordered there may be more than one package sent. If you require each item individually packaged, please let us know when asking for a quote.

How long do you keep my project on your server? Can I order it again without uploading?

As a matter of privacy, the longest we keep your projects on our server is 90 days, unless asked by you to do otherwise. After 90 days, your project is deleted from our server.

Your project does, however, remain on your computer. We suggest keeping a backup of your projects, along with the images you've used in the project. You can find the project files in your 'Documents' or 'My Documents' folder.

Your image files will be stored wherever you saved them.

Our software doesn't move, copy, or store your photos. We take no responsibility for the storage of your projects and images.

If your project was uploaded within 90 days, in most circumstances we can arrange a reprint without requiring you to upload your project a second time. To arrange this, please email forms@photobooksrus.com.au with your previous order number (OL818...).

Scroll to top